For a project we had to create 1 second a weeks worth of animation. This was just so that we were animating at least something every week throughout our second year of university. I managed to get 9 out of 12 done as my other projects took up the majority of my time.
Since the first year, I have mostly been animating on photoshop, so all of my 1 seconds are made using photoshop except for the last one. The last animation was done via stop motion as this is the medium that I want to specialise in.
Grappling- https://www.youtube.com/watch?v=E2dfL1hoakg
Standndoff- https://www.youtube.com/watch?v=Nf0HNAH0HkM
Running cat- https://www.youtube.com/watch?v=DjcxEbpy6dg
Graveyard ghost- https://www.youtube.com/watch?v=FIX6tcByPck
Electrocution- https://www.youtube.com/watch?v=5m4fff_R6mw
Bird flapping- https://www.youtube.com/watch?v=Ojs6RsxFZ5g
Alien plant attack- https://www.youtube.com/watch?v=IiKRX15rJFo
Sheep jump test- https://www.youtube.com/watch?v=OSFwKQpw_kA
Christmas- https://www.youtube.com/watch?v=LCpL2-iaP-k
It was fun making these as it enabled me to go a little crazy with what could create.
Friday, 12 December 2014
Tuesday, 9 December 2014
Woodland creatures Design work
For this project we
have to think of 3 animals that exist in a woodland environment and make them
into characters suitable for children. In order to do this I had to have a look
at what woodland animals there are and see if the give me inspiration.


 After a quick google search I found this a website which has a
few common woodland animals on it. The two that stick out to me are the fox and
the mouse. This is because these are two animals thatmost children know about
and can be made into characters with ease. I decided to look more into the animals and see if I could
draw them. As you can see, the fox is rather cute and I believe that if
I try and give it a cartoon look such as the image from the animation ‘Fox and
the Hound’, I think children would like this character. As well as this, the
simple colours make it easy to draw and would be simple to animate if needed as
it wouldn’t be too difficult to replicate multiple times.
Mouse


Next I looked at mice. Mice are typically timid, so my
immediate thought was to make him the complete opposite and make him extremely
brave instead. The good thing about creating a mouse character is that they
often stand up on their hind legs so making my character do that would not be
anthropomorphising it. Mice have been used inmany animations before such as
mickey mouse or the rescuers, as seen above.
Lyrebird
Next I thought about typical children’s characters and what
the characters are. The more I thought about it the more I saw that most characters
could be seen as role models. A common role model for a child is an adult, such
as a parent of a teacher. I then searched around for what could be an
interesting animal that could also be a role model.
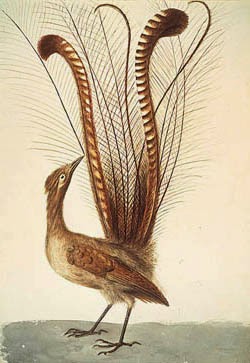
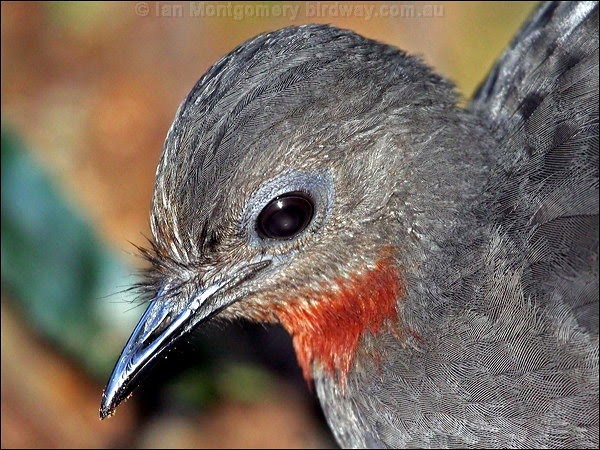
A while ago I came across a bird that could replicate any
sound it heard. This bird was called the Lyrebird
The Lyrebird is amazing as in the video, it doesn’t just
imitate other bird calls perfectly, but there were some loggers close by and it
copied some of the sounds it heard such as a car alarm, a chainsaw and even the
car radio. As well as this it also has a beautiful peacock like set of feathers
in its tail which I thought would be very interesting to draw. I thought about
how I could include its vocal ability into a character as well as creating a
role model and came up with the idea of a teacher, possibly a music teacher and
the bird could teach other birds to sing.
Another idea I had was a wise owl,
playing with the stereotypical symbol that all owls are ‘wise’. My first
thought was that I could do an owl sitting in a rocking chair with glasses on,
reading stories to the other animals. Unfortunately, after a little research, I
realised that a character like that had already been created in ‘Winnie the
Pooh’.
I didn’t need to think much about how I could turn these
animals into characters because as soon as I saw the animal, I could see what
kind of character they could be.
When I saw the fox, I instantly saw a little fox that loves
adventures which lead me to create an adventure fox. In order to show his
adventurous side in the form of physical objects, I decided to give him a
safari helmet and I let his ears stick through the helmet as I thought it
looked rather cute. After looking at the character I then gave him binoculars
around his neck just to make him look like he is ready to go on an adventure.
Next I looked at the Lyrebird. At first I wasn’t sure how I
was going to show that the Lyrebird is a teacher, it needed something that
would show she is a teacher. This was when I thought of the old teachers hats.
Character designing
Since the bird has quite a round head I thought this hat would work rather well and add the appropriate look to the character. I also gave her a pointing stick as a prop.
I then began creating some drawings to see what the character could look like.
After that, I experimented with a variety of colours to see what colours looked best.
The next thing i did was see how I could make the character more interesting so I thought about the role I wanted the character to take which was a music teacher so I developed the tail to look more interesting. I drew an image of the tail resembling treble clefs notes.
I then made a little information sheet about the lyrebird
I found a fact that says that the lyrebirds name originates from the musical instrument (Lyre) and then I put those two images on the sheet which is when I realised I could make the tail look like the lyre instrument and that the character could possibly its tail. I then went on to developent the tail further.
Character modelling
The next thing I did was begin to model the character. The first thing I did was draw a life size drawing from the front and the side of the character and then I began to form the main body out of foam.
The next thing I did was to measure out some wire to make sure the legs were able to support the character. I made the wire longer than it needed to be so that I could form the legs around the wire and then fix the rest to the base of the set. I then covered the whole thing in sculpy and formed feet and an open beak.
I also made a little mortar board hat so that you can recognize it as a teacher.
The next stage was to make detailing parts such as wings and the tail. Each wing has 13 seperate feathers and I carved in some musical note detail to make them look more interesting. I was a little stuck on how i was going to make the harp tail. At first I was going to use a paper version with a thin wire skeleton inside. However, I found a problem with that method as I would have needed to fold the paper and that would have looked reallly bad. I settled on a sculpy harp with a wire armeture inside.
After that I attached the harp and the left wing onto the body, making sure that it looked like the wing was holding the harp up. The model was almost finished at this stage so I added details such as wire to make strings on the harp, facial features such as nostrils on the beak, eyes and eyebrows, detailing on the legs, a ring of feathers around the neck and I even used white spirit to smooth the surface of the model and then scratch in some feather detail. The model was finished so I baked it in an oven.
After that I attached the harp and the left wing onto the body, making sure that it looked like the wing was holding the harp up. The model was almost finished at this stage so I added details such as wire to make strings on the harp, facial features such as nostrils on the beak, eyes and eyebrows, detailing on the legs, a ring of feathers around the neck and I even used white spirit to smooth the surface of the model and then scratch in some feather detail. The model was finished so I baked it in an oven.
Set designing
The final step was to build the set for the character to go in. I knew from the start what I wanted the set to look like. I wanted it to be a classroom to show off the role of the character but also have some woodland elements to show the location of the set.The images above show two different colour variations to the walls and the charatcer placed into the environment.
Making the set
I started with the base that my teacher gave me and cut it into the shape I wanted with two walls so that it looked like it was the corner of a room. The first piece I made was the blackboard which was made out of black card and lollipop sticks. I stuck a piece of cream card on the walls, attached the blackboard and then began the long process of cutting lollipop sticks to size and sticking them to the walls.
I also found an old watch at home which I though would look really good in the set so my dad changed the battery so that it actually worked, grinded off the sides and we set it into the wall by partially drilling into the wall.As you can see from the picture above, then set is really taking shape. I was going to use more lollipop sticks to make the floorboards but that would have been very time consuming, so I made a floorboard pattern on photoshop, printed it off and stuck it to the base.
I thought about what makes a classroom and realised that I didnt have any students for the character to teach so I made a few little birds. Each is slightly different than the other. One is normal, one is a little fatter, one is wearing glasses and the last one has its wing up like its answering a question.
I also wanted to make it look like the animals have found human items and recycled them in some way. I used straws and matchboxes for the desks and used bottle tops and matches to make stools for the students. I decided not to paint them so that you could see exactly what they were.
I added a few little extra details such a more lollipop sticks to give an ending to the bordering on the walls and two music posters, on of which I had in my music classroom when I was in school.
The finished set and character
I painted the little birds nice bright colours to attract the young target audience. I also made the branches out of pipecleaners to make it look more child friendly.
I painted the bird in accordance to my designs, apart from making the head the same colour as the body. I also made the legs a bright yellow. After I had painted it, I realized that the back of the bird looked pretty blank, so I thought about how I could fill that space. As I was shopping for items for the items, I came across a bag of feathers that I thought would look good on the bird. I drilled very small holes into the back of the bird and arranged a number of the feathers like the plummage of a peacock which looks very good and gives a nice contrast compared to the solid material of the bird. As well as this I also highlighted certain details with a felt tip pen.
I really like how the model and set turned out and I thoroughly enjoyed this project. I dont think there is anything I would have done differently as I am so happy with how everything turned out.
Subscribe to:
Comments (Atom)


